Showing posts with label Dark Chocolate. Show all posts

Sunday, 11 January 2015

Chocolate Mousse Tart

The book I found this recipe in advises "The only chocolate tart. This you must make".Well ok then, you don't have to tell me twice. And the truth is, this is the best advice you'll have been given for a while.


I love a chocolate tart and it will often be my first choice off the menu. They can be extremely rich though and not something you can eat much of. This one, however, has all the chocolatey depth and richness but at the same time it's as light as a feather and is, in my humble opinion, pretty close to perfection.

No it's not a super simple recipe but with a bit of patience it shouldn't cause you too many problems. Adding the egg yolk to the pastry makes it very easy to work with and the tip below about using leftover scraps to fill any cracks is worth remembering. The filling is also pretty easy as long as you're prepared to be a little patient when whisking up the eggs.

In short, this is a dinner party classic and any effort put in is more than rewarded at the other end.

Chocolate Mousse Tart
(from Simon Hopkinson's Roast Chicken & Other Stories but also published in Books for Cooks Favourite Recipes from Books 1, 2 & 3)

for the pastry case
175g/6oz plain flour
45g/1 1/2oz sifted icing sugar
a good pinch of salt
90g/30z very cold butter, cubed
1 organic egg yolk plus 1 tbsp cold water

for the filling
150g/5oz butter
200g/7oz plain chocolate, broken into pieces
3 organic egg yolks
2 organic eggs
3 tbsp caster sugar

1) Lightly butter a 24cm/9 1/2inch tart tin and put it into the fridge to chill.

2) Put the flour, icing sugar and salt in a food processor and pulse a couple of times to aerate. Add the butter and process until the mixture resembles fine breadcrumbs. Add the yolk and water (if necessary) and process until the pastry just draws together. Turn out onto a floured work surface and knead briefly to form a flat round.

3) Unless it's a very hot day you can roll the pastry out straightaway without chilling it first. Line the chilled tin, trim the pastry (although leave a centimetre or two above the rim as it will shrink - you can trim it some more later) and put into the fridge to rest for at least an hour (I left mine overnight with no adverse effects). Do not through any leftover pastry away, but wrap it in some cling film for later (see below).

4) Put a baking sheet in the oven and preheat to 190c/375f). Line the chilled pastry case with baking parchment, fill with baking beans and cook for 10 minutes. Carefully remove the beans and paper and cook for another 10 minutes or until the pastry is a light biscuit brown. Any cracks can be filled with your spare pastry - the residual heat will cook it.

5) For the filling, melt the butter and chocolate together either in a microwave or in a bowl over a pan of barely simmering water. Leave to cool slightly.

6) Whisk the egg yolks, eggs and sugar until very thick and pale (this is the key to this dish - using a hand mixer I did this for at least 10 minutes). Pour the melted chocolate mixture on to the egg mixture and fold together until well mixed.

7) Pour into the pastry case and bake in the oven for 8 minutes when the tart filling will look just set but still a little wobbly. Leave to cool completely before trying to cut it. Finish with a dusting of icing sugar and serve with fromage frais, creme fraiche, cream or ice cream.

Serves 6-8


Sunday, 6 May 2012

Hairy Bikers' Chocolate & Hazelnut Cake (Torta Gianduia)

I was watching the Hairy Bikers' Bakeation program a couple of weeks ago and as soon as I saw them making this cake I knew I had to make it as soon as possible. Before making the cake they spent some time with a local hazelnut grower who showed them how he turned his hazelnuts into the most fabulous-looking homemade chocolate spread (like Nutella but more so). They then proceeded to make the most tempting-sounding cake and smothered it with the chocolate spread. I was sold.

So I stocked up on the necessary ingredients and today had the opportunity to make it. There are a few stages involved in the cakes construction - baking and blitzing the nuts, melting the chocolate, beating the eggs - but it was soon in the oven and filling the house with an amazing aroma. Sadly I didn't have any homemade Italian chocolate hazelnut spread to hand so Nutella was the next best thing and it was very satisfying to spread over the cooled and turned out cake. Just a few hazelnuts for decoration and it was ready to eat.

 The resulting cake was dense and moist, almost brownie-like in texture. As the recipe doesn't include flour it doesn't have the usual airy texture of a sponge cake but was rich and very chocolatey with plenty of texture and flavour from the hazelnuts. An undeniable winner from start to finish.

You can find the recipe here...what are you waiting for.....!


Thursday, 24 November 2011

We Should Cocoa - Chocolate & Caramelised Apple Cake


It's been a while since I entered the We Should Cocoa monthly challenge, where bloggers make and share recipes that include chocolate and another ingredient suggested the challenge host for that month.  I was determined to join in again this month but when I saw the theme I wasn't convinced I was going find a recipe to fit the bill.


This time the challenge is being hosted by Chele from the Chocolate Teapot blog and her chosen theme is apples, which is not something you automatically think to pair with chocolate.  Pears, yes, but apples? After a bit of searching I found a few apple recipes you could add chocolate to but what I really wanted was the reverse - a chocolate recipe you could add apples to.  In the end I settled on the idea for a really good chocolate apple cake and at about the same time it also occurred to me that I had the perfect cake tin for the job.  Well, "tin" isn't quite the correct word as this is one of those flexible rubber cake moulds that I bought on a whim several years ago.  I have used it a grand total of zero times since I decided I just had to have it and in the intervening years it's mostly been gathering dust in my cupboard and occasionally falling out on to my head.


As you can see, though, it's the perfect shape for this recipe and I loved the way the cake looked when it was turned out.

The cake recipe is more brownie-based than a standard sponge as it contains melted chocolate and cocoa powder which gives it a good chocolatey flavour and a wonderful, slightly gooey texture in the middle.  The apple complemented the chocolate perfectly and all-in-all it was very well received by my most discerning critics (ie my family).  I definitely be making this one again.


Chocolate & Caramelised Apple Cake

2 bramley apples, peeled, cored and cut into approx 24 slices
1oz/25g butter
1oz/25g sugar

For the cake
4oz/115g butter
1 1/4 oz/40g dark chocolate, broken up
3/4 oz/20g cocoa powder
2 eggs, separated
4oz/115g caster sugar
3oz/75g plain flour
1 teaspoon baking powder
2 tablespoons milk

1) Preheat the oven to 180c/350f/gas 4.  Grease and line a 20cm cake tin.

2) Melt the 1oz of butter in a frying pan over a medium to high heat until it starts to bubble then add the apple slices and fry for a few minutes on each side until golden.  Increase the heat and sprinkle over the sugar and 1 tablespoon of water.  When the sauce begins to turn golden, stir the apples in the pan until they are coated in the caramel.

3) Melt the remaining butter in a small saucepan over a low heat, then add the cocoa and chocolate and stir until melted.  Remove from the heat.

4) Whisk the egg yolks until they are foamy then beat in the sugar.  Add the chocolate mixture, slowly at first, then sift in the flour and baking powder and mix well.  Add the milk and mix until smooth.

5) Whisk the egg whites in a separate, clean, dry bowl until stiff then carefully fold into the cake mix, being careful not to knock the air out.

6) Line the bottom of the cake tin with the sliced apples (you may not need all the slices) and any remaining caramel, then carefully pour the cake mix over the top and smooth the surface.  Bake in the oven for 30-35 minutes.  At the end of this time the middle of the cake will still be unnervingly undercooked but try not to worry, this will set into a gooey fudginess in due course.  Leave the cake to cool completely in the tin before carefully turning out.

Cuts into 8-10 slices.


Sunday, 6 November 2011

Rocky Road Crunch Bars

One of the things that pains me the most about the rise in food prices in recent years is the dramatic increase in the price of chocolate. Dark chocolate appears in so many of my favourite recipes but where a couple of years ago 100g of decent 70% dark chocolate cost about a pound, these days you'll easily pay about 50% more than that and even more if you want organic.


So, when I use it I want to really make it count and this is a recipe that really makes you feel like you've got your money's worth. If you search for Rocky Road online you'll find a variety of different recipes and ultimately you can add pretty much anything you like - digestive biscuits, ginger biscuits, marshmallows and any sort of dried fruit that takes your fancy.

This time I've used Nigella's recipe from her book, Nigella Express, which is one my favourite of her books and contains lots of quick and easy recipes that I've used time and time again.


This is one of the simplest recipes for Rocky Road as it just contains crushed Rich Tea biscuits and marshmallows. Next time I might try adding a handful of raisins to the mix aswell. As this only uses dark chocolate it might not appeal to some children (mine weren't overly keen) so if you want to make a more family friendly version you might want to replace some or all of the dark chocolate with milk. Most adults, though, will love the dark, rich combination of crunchy biscuit and squishy marshmallow. I certainly do and I'm just wondering if I can justify having another piece already.

On a final note, the tin I used was a bit bigger than the one specified so I struggled to cover the whole of the top with the reserved chocolate. When I make it again I think I'll size down, tin-wise, rather than up.


You can find the recipe on Nigella's website here.

Thursday, 30 June 2011

Mocha Banana Smoothie and Food Blogger Connect 2011


Every year food bloggers and writers from all over Europe and beyond have the opportunity to attend Food Blogger Connect, which is the largest food blogging conference in Europe and gives like-minded bloggers the chance to meet and listen to a number of high-profile guest speakers. This year the conference is being held in London on the 11th to 13th August and of course I would love to go but sadly I don't have the funds to take me there.

Luckily though, I might still be in with a chance of going as Cuisinart, one of the sponsors of FBC11, have launched a competition that will enable the two lucky winners to get free entry to the full weekend conference, including an opportunity to participate in the cooking demonstration with Celebrity Chef Anjum Anand.

Sounds good to me!

All I have to do is post a smoothie recipe of my own making or from any recipe provided by Cuisinart or Anjum Anand's books.

My recipe was inspired by a desert I used to have when I was little - ice cream mixed with Camp Coffee Essence. I love the sweet coffee flavour it lends to anything you add it to and it tastes great mixed up with bananas, ice cream and a little bit of dark chocolate.

Mocha Banana Smoothie

2 bananas
2-3 scoops of vanilla ice cream
1 tablepoon Camp Coffee Essence
1 tablespoon finely grated dark chocolate plus extra for sprinkling
a splash of milk
whipped cream for decoration

1) Pile everything bar the cream into a blender and whizz until combined.

2) Serve in a tall glass and top with cream and a sprinkling of grated chocolate.

Serves 1

Monday, 25 April 2011

Tiramisu Trifle

No Meal Planning Monday for me today as I've had a busy couple of weeks and feel all cooked out. I know that tonight we're having Souffled Macaroni Cheese and tomorrow it's the Roasted Pepper, Pancetta and Mascarpone Risotto that I never got around to making last week but beyond that it's anyone's guess!


Instead, though, I can tell you about this fantastic Tiramisu Trifle that I made at the weekend. This is just perfect for high days and holidays at any time of year. I've made it many times at Christmas and it went down very well at our outdoor barbeque yesterday.

The custard and mascarpone make it rich and creamy and the Amaretto/coffee combination make it smell amazing and taste even better. Oh, and of course it's easy to make too!

Tiramisu Trifle
(adapted from Good Food Magazine, January 2003)

1/2 pint/300ml strong coffee
6 fl oz/175ml amaretto
500g tub mascarpone
500g fresh vanilla custard
9 oz/250g sponge fingers
3 oz/85g dark chocolate, chopped, plus extra to decorate
4 tbsp toasted flaked almonds

1) Pour the coffee and Amaretto into a wide dish.

2) Whisk the mascarpone and custard together using a hand whisk or blender.

3) Take a third of the biscuits and dip each one in the coffee/Amaretto mixture and then place in the bottom of a 2 litre serving dish.

4) Sprinkle a third of the grated chocolate over the biscuit layer and then follow with a third of the mascarpone and custard mixture. Repeat this process twice more to create three distinct layers.

5) Place the trifle in the fridge and leave for at least two hours or overnight.

6) Just before serving, sprinkle the trifle with the almonds and extra chopped chocolate.

Serves 8 - 10 generously

Friday, 24 September 2010

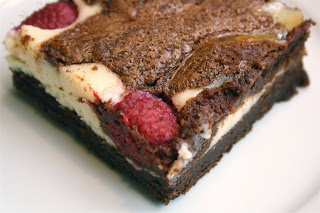
We Should Cocoa Monthly Challenge - Raspberry Cheesecake Brownies


When I heard that two other food bloggers were organising a new monthly baking challenge AND it involved chocolate my ears pricked up immediately (in the virtual, online sense anyway). Chocolate is one of my most favourite ingredients to work with and provides a base for so many fantastic recipes.

The challenge, We Should Cocoa, is being hosted alternately by Choclette of Chocolate Log Blog and Chele of Chocolate Teapot and the idea is to make something using chocolate each month. The most important rule is that it should include the special ingredient(s) selected by the host for that month.

This month Chele is hosting the challenge and she has chosen raspberries as the special ingredient. No problem for me here - if you want to combine chocolate and raspberries into one recipe then this one is just perfect.


Raspberry Cheesecake Brownies
(adapted from a recipe found in delicious magazine)

200g/7oz quality dark chocolate
200g/7oz unsalted butter, softened
400g/14oz caster sugar
5 eggs
110g/4oz plain flour
400g/14oz cream cheese
1 tsp vanilla extract
120g/4 1/4oz fresh raspberries

1) Preheat the oven to 180c/fan 160c/gas mark 4. Grease and line a 30 x 20cm rectangular cake tin.

2) Please the chocolate in a bowl over a pan of simmering water until melted. Set aside to cool slightly.

3) Cream the butter and 250g of the caster sugar until pale, then add 3 of the eggs, one at a time, beating well after each one. Stir in the melted chocolate then fold in the flour. Spread three quarters of the mixture into the lined pan.

4) In a separate bowl, beat the cream cheese, remaining sugar and eggs and the vanilla extract until smooth, then spread over the chocolate base. Dollop the remaining chocolate mixture over the cream cheese layer and use a fork to swirl the chocolate. Push the raspberries into the top and bake for 40-45 minutes until just firm on top. Allow to cool then cut into squares.

Makes about 15


Thanks to Chele for hosting this month's challenge. To have a look at all of the other entries this month make sure you visit her Chocolate Teapot blog after the 26th of September.

Sunday, 11 April 2010

Chocolate & Cranberry Biscuits

Wow, don't you just love this sunny weather? Finally, we can throw open the windows, hang out the washing and just generally get out of the house without needing to put twenty layers on first.


Anyway, here's a great recipe for anyone who still has a post-Easter chocolate surplus and wants to find an excuse to siphon some off and put it to better use. The original recipe calls for dark chocolate but it doesn't matter in the slightest - you can use whatever you have to hand.

This is a great recipe from the beautiful Apples for Jam by Tessa Kiros. The biscuits are packed full of chocolate and cranberries and so you end up with little hilly, knobbly biscuits rather than the neat flat ones. Trust me, this is no bad thing.


Chocolate & Cranberry Biscuits
(adapted from Apples for Jam by Tessa Kiros)

75g/2 3/4 oz butter, softened
50g/1 3/4 oz soft brown sugar
50g/1 3/4 oz caster sugar
1 egg
a few drops of vanilla essence
160g/5 3/4 oz plain flour
1/2 tsp baking powder
110g/3 3/4 oz chocolate, roughly chopped
50g/1 3/4 oz dried cranberries

1) Preheat the oven to 190c/375f/gas mark 5

2) Cream the butter and sugar together in a large bowl then beat in the egg and vanilla.

3) Beat in the flour, baking powder and a pinch of salt until you have a sandy mixture, then stir in the chocolate and cranberries.

4) Spoon teaspoonfuls of mixture on to two lined baking sheets (the original recipe suggests you use your hands to roll the mix into neat balls which you then flatten slightly. I suggest that this is far too much trouble to go to and just plopping the mixture directly on to the baking sheet with a spoon means that you'll get your mitts on the finished article in much less time).

5) Bake for 12-15 minutes until the biscuits are just starting to brown round the edges. Leave to cool for a few minutes before transferring to a wire cooling rack.

Makes about 30

Friday, 25 September 2009

Caramel Oat Bars

Otherwise known as Millionaire's Shortbread but with a slight adaptation. Where Millionaire's Shortbread has a base of - yes, you've guessed it - shortbread, this version includes the added bonus of oats. This is a change I wholly approve of - it makes the base lighter and crunchier and adds to the contrast with the soft caramel and chocolate.

If you have any leftover condensed milk (I have yet to find a 175 tin of the stuff) and were wondering what to do with it then you might want to take a look at these oat bars or this fudge - you can always halve the quantities!


Caramel Oat Bars
(original source of recipe long forgotten)

Base
100g/4oz butter or margarine
50g/2oz caster sugar
75g/3oz plain flour
75g/3oz porridge oats

Caramel
175g/7oz can condensed milk
100g/4oz butter or margarine
50g/2oz soft brown sugar
vanilla essence

Topping
100g/4oz chocolate, melted (you can use dark or milk chocolate depending on the level of sweetness you're after)

1) Grease a baking tin approximately 30 x 18cm (12 x 7 in)

2) Cream the butter and sugar together until light and fluffy, stir in flour and oats to form a stiff mixture and press into the tin

3) Bake for 20 minutes at 180c/350f/gas 4

4) Meanwhile, melt the butter, condensed milk and brown sugar in a pan over a gently heat. Simmer for 5 minutes, stirring continuously. Add vanilla essence to taste and beat well. Pour evenly over the cooked base and leave to cool.

5) Spread melted chocolate over the cooled caramel and mark with a fork. Leave to set before cutting into squares.

Friday, 3 July 2009

A dangerously simple recipe

I am cursed with a terrible affliction - I call it chocolate telepathy.

Chocolate speaks to me you see. I hear it calling to me from far off places....the cupboard, the supermarket, the freezer (see below). Against my will the little voices draw me in, enticing me, encouraging me, until I'm helpless to resist. I hear stories of people leaving chocolate untouched in their cupboards for days, weeks even, but I don't believe them.

Today I am suffering at the hands of this little recipe that I found in Nigella Express (I know....Nigella again). Make it at your peril!

Chocolate Pistachio Fudge
(adapted from Nigella Express by Nigella Lawson)

350g dark chocolate (min 70% cocoa solids), chopped
1 x 397g can condensed milk
30g unsalted butter
pinch salt
150g pistachios, chopped

1) Melt all of the ingredients, apart from the pistachios, in a heavy based saucepan over low heat, stirring regularly.

2) Mix in the pistachios (as you can see from the picture I substituted the pistachios for raisins and was more than happy with the result).

3) Pour into a 23cm foil tray (or any tin of similar proportions) and smooth the top.

4) Leave in the fridge to cool then cut into bite-sized pieces.

5) The fudge can now be stored in the freezer presumably with the intention of keeping for a reasonable length of time. Good luck with that.

Wednesday, 1 July 2009

Chocolate Orange Loaf Cake

This month I've decided to switch my monthly baking challenge allegiance over to Sweet and Simple Bakes as the recipe on offer this month looked too good to pass up. It's not a recipe I've come across previously but just the name was enough to tell me I was going to like it.


The chosen recipe this month was for Chocolate Orange Drizzle Loaf Cake and I think the name tells you all you need to know! And what a great recipe this is. The addition of orange zest and the orange syrup to what is basically a plain sponge recipe adds an enormous amount of flavour and, as you would expect, the chocolate is a perfect partner for the orange.

Chocolate Orange Drizzle Loaf Cake

For the cake
175g/6oz softened butter
175g/6oz caster sugar
3 large eggs at room temperature
Finely grated zest of two oranges
175g/6oz self raising flour
2 tbsp milk
For the orange syrup
Juice of 1 orange
100g/4oz granulated sugar (although I just used caster sugar again)
For the topping
50g/2oz dark or milk chocolate (I used dark and was glad I did)
Sprinkles of your choice (optional)

1) Preheat the oven to 180c/350f/gas 4

2) Cream the butter and sugar until light and fluffy. Add the eggs one at a time and beat in until fully incorporated. Add the orange zest, flour and milk and fold in gently with a spatula or metal spoon.

3) Pour the mixture into a greased/lined 900g/2lb loaf tin and bake for 35-45 minutes until a skewer inserted into the centre comes out clean. When cool make little holes in the cake for pouring the syrup into.

4) Make the syrup by putting the orange juice and syrup into a pan and heating gently until the sugar is dissolved. Bring to the boil and boil for a couple of minutes. Pour the syrup over the top of the cake. The leave the cake to cool completely before removing it from the tin.

5) Melt the chocolate in a bowl over a pan of barely simmering water. When melted spread it over the top of the cake. Smooth with a spatula or make patterns with the prongs of a fork. Add sprinkles if required. Leave the chocolate to cool before cutting the cake.

Friday, 17 April 2009

A spare egg white

The Viennese Biscuits I posted about previously resulted in a spare egg white which gave me an excellent excuse to bake the following recipe. This is one of my all-time favourite recipes and ranks very highly on my effort/reward scale! (I will try and elaborate on this at a later date). In short, they are ridiculously easy to make and taste fantastic.


Forgotten Cookies
(by David Oppedisano writing in Good Food Magazine)

2 large egg whites
120g (4 1/2 oz) golden caster sugar
120g (4 1/2 oz) pecan nuts, roughly chopped
150g (5oz) dark chocolate (at least 70% cocoa solids), roughly chopped
1 tsp vanilla extract

1) Preheat the oven to 180C/Gas Mark 4. Line two baking sheets with foil.

2) In a large clean bowl, whisk the egg whites with a pinch of salt until stiff and dry. Gradually whisk in the sugar to make a thick and glossy meringue. Gently fold in the nuts, chocolate and vanilla.

3) Spoon heaped teaspoonfuls on to the baking sheets. These don't tend to spread a great deal so you don't need to leave huge gaps.

4) Put the sheets in the oven, then turn it off and leave the cookies for at least 3 hours, overnight, or until the oven is cold.

5) Carefully peel the cookies from the foil and store in an airtight container.