Monday 25 October 2010

Chocolate & Cobnut Meringue Pie


Aswell as thinking of ways to use my recent supply of chocolate from Hotel Chocolat, I've also been on the lookout for a recipe that fits the bill for this month's We Should Cocoa challenge - a monthly baking challenge where participants have to cook with chocolate and another, pre-selected, ingredient. This month's challenge is being hosted by Choclette from The Chocolate Log Blog and she has selected cobnuts or hazelnuts as the added ingredient.


Cobnuts, as I have learnt since embarking on this challenge, are just a variety of hazelnut. I was initially just going to stick with hazelnuts, but by chance I came across a big pile of cobnuts for sale at a local farmers market so grabbed a bagful while I had the chance. If you fancy learning more about cobnuts then you might want to take a look at the Kentish Cobnuts Association website.

The recipe I selected this month is one I've had my eye for years and the title suggests great things. Chocolate pastry and a chocolate filling topped with nut-speckled meringue sounded like my kind of pudding and I'm pleased to say it lived up to all my expectations. The pastry was deliciously sweet, the filling was rich and the meringue topping was light with added crunch from the cobnuts.

It was also pretty straightforward to make. Chocolate pastry can be notoriously tricky to roll out but I used my tried and tested method of rolling it out between two pieces of clingfilm and had no problems. I had a bit of a hitch with the filling when I realised I didn't have enough cornflour but I topped it up with plain flour with no obvious problems. The chocolate custard turned out quite thick but I won't know until I try it again whether that was down to the flour. All in all it tasted pretty fantastic and I think it tasted even better the next day when the filling had cooled completely and set even more. This is definitely a 5 star recipe.

Chocolate & Cobnut Meringue Pie
(adapted from Chocolate by Marks & Spencer)

Pastry
175g/6oz plain flour
75g/3oz unsalted butter
25g/1oz plain chocolate, grated
25g/1oz icing sugar
1 egg
1-2 teaspoons cold water

Filling
50g/2oz cornflour
3 egg yolks
25g/1oz caster sugar
1 teaspoon vanilla essence
600ml/1 pint milk
175g/6oz plain chocolate, chopped (I used my lovely Hotel Chocolat 70% Dark Chocolate Drops again)

Meringue
3 egg whites
175g/6oz caster sugar
25g/1oz cobnuts (or hazeluts), toasted and finely chopped

1) To make the pastry, sift the flour into a bowl and add the butter, cut into small pieces, then rub it into the flour (I blitz it together in my food processor). Stir in the chocolate, icing sugar, egg yolk and enough water to mix to a firm dough. Knead lightly, then wrap and chill for 30 minutes (I left mine overnight in the fridge but it needed to sit for a while at room temperature to warm it up a bit the next day).

2) Roll out the pastry on a lightly floured surface and use to line a 23cm/9 inch plain or fluted flan ring set on a baking sheet. Bake blind, (by lining the tin with greaseproof paper and filling it with baking beans or dried beans) in a preheated oven, 200c/400f/gas mark 6, for 15 minutes. Remove the paper and beans and cook for a further 5 minutes.

3) To make the filling, mix together the cornflour, egg yolks, sugar, vanilla essence and a little of the milk in a large bowl. Bring the remaining milk to the boil in a saucepan. Pour over the egg mixture, stirring.

4) Return the mixture to the saucepan and cook for 2 minutes, stirring until thickened. Add the chopped chocolate and stir until melted. Pour the mixture into the pastry case.

5) To make the meringue, whisk the egg whites until stiff. Gradually whisk in the sugar, a little at a time, until the mixture is stiff and glossy. Stir the nuts into the meringue.

6) Spoon the mixture over the pie, shaping peaks with the back of a spoon. Place under a preheated hot grill for about 2 minutes (pay attention to this bit! The meringue can turn from pale brown to almost black in seconds - I just caught mine in time!) until the peaks are golden. Serve warm or cold with pouring cream.

Serves 8


Wednesday 20 October 2010

Chocolate Chip Cookies - Two Varieties

Since my last post about the lovely parcel sent to me by Hotel Chocolat I have been putting my samples to good use. This post is about the first two recipes I tried - both for chocolate chip cookies. When I first saw the chocolate drops in my parcel cookies were the first thing that sprang to mind so I searched through my recipe books for some new inspiration. The recipes I settled on are fairly similar but I thought I try them both anyway. I've been meaning to try the Books for Cooks one for ages and Rachel Allen's peanut butter version sounded really appealing. I was also interested to compare the two different methods for making them with one batch being cooked straight away and the other stored in cling film in the fridge over night before being sliced up and cooked.

So, first up is the Books for Cooks version which were cooked straight away. I found these spread quite a lot which resulted in them having quite thin edges (compared to batch number two below). Nevertheless they tasted really good although I would say they probably didn't need quite so much chocolate in them.


Sarah's Chocolate Chip Cookies
(adapted from a recipe by Sarah Benjamin in The Book for Cooks Collection Volume 6)

150g/5oz plain flour
3/4 tsp baking powder
a pinch of salt
125g/4oz/1 stick butter, softened
125g/4oz soft brown sugar
50g/1 3/4oz caster sugar
1 tsp natural vanilla extract
1 egg
175g/6oz dark chocolate, coarsely chopped (I used my Hotel Chocolat 70% Dark Chocolate Drops)

1) Heat the oven to 180c/350f/gas 4. Line two baking sheets with baking parchment

2) Sift the flour, baking powder and salt together. Beat the butter, sugars and vanilla together until light and fluffy. Beat in the egg with a tablespoon of flour. Add the remaining flour mixture in three batches, blending until the mixture forms a dough. Fold in the chopped chocolate.

3) Drop tablespoons of the cookie dough on the baking parchment lined baking sheets, leaving at least two inches between each one as they will spread.

4) It's best to cook one baking sheet at a time but if you do bake them together be sure to rotate the baking sheets half way through the cooking time. Bake until the cookies are just slightly coloured on top and golden around the edges, about 10-12 minutes. They should be baked until just set - if you over back them the cookies will end up crunchy rather than chewy.

5) Place the baking sheet on a wire rack for a few minutes to allow the cookies to cool slightly and firm up a little, then transfer the cookies to the wire rack to cool completely.

Makes about 30 cookies

************

Next up, Rachel Allen's Chocolate Chip Peanut Butter Cookies. For this batch I followed Rachel's suggestion to wrap the cookie dough in cling film and store it in the fridge until needed. I found this to be a brilliant method and ideal if you if you don't have much time to prepare the cookies right before you need them. All the work can be done a day or more in advance and on the day all you need to do is slice up the cookies and bake as usual. The other benefit, as you can see below, is that you get much neater looking cookies!


Chocolate Chip Peanut Butter Cookies
(adapted from Food for Living by Rachel Allen)

200g/7oz crunchy peanut butter
200g/7oz butter, softened
250g/9oz light muscovado or soft light brown sugar
1 tsp vanilla extract
2 eggs
250g/9oz chocolate, chopped (I used my Hotel Chocolat 40% Milk Chocolate Drops)
350g/12oz plain flour
1 tsp bicarbonate of soda
pinch of salt

1) Preheat the oven to 180c/350f/gas mark 4

2) In a large bowl beat the peanut butter, soft butter, sugar and vanilla extract until soft and creamy. Beat in the eggs, one at a time, then add the chocolate. Sift in the flour, bicarbonate of soda and salt and stir to mix.

3) Roll heaped teaspoonfuls of the dough in your hands to form balls, then place them spaced apart on baking trays (there is no need to grease or line them). *

4) Bake in the oven for 12-16 minutes until light golden in colour. Carefully lift them off the trays when cooked and place on a wire rack to cool.

* Alternatively (as I did), roll the dough into a log about 2cm in diameter. Roll up in cling film and place in the fridge. When ready to cook, unwrap the log and cut into slices about 8mm thick. Place on the baking trays and cook as above. The dough can be stored in the fridge for up to 1 week, or in the freezer for up to 3 months. You can cut slices from the frozen dough and cook straight away.

Makes about 60 cookies

Thursday 14 October 2010

Hotel Chocolat's Cocoa Cuisine Range

Hotel Chocolat contacted me recently to ask if I would like them to send me something to sample and review.

Hmmm...let me just think about that for a minute...

Actually I didn't think about it at all. I've been a fan of Hotel Chocolat for quite some time (dissecting and sampling their Tasting Club selection boxes has become a something of a family tradition) so I was embarrassingly quick to reply with a firm yes please!

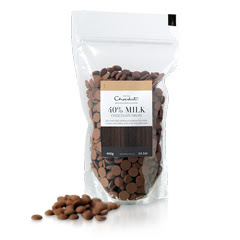
When the box arrived and I had ripped it open like a kid at Christmas I was delighted to discover two fat bags of chocolate drops, one containing 40% Milk Chocolate Drops and one containing 70% Dark Chocolate Drops. Each bag weighs a substantial 400g and, ingeniously, has a resealable opening (although on the down side this makes it far too easy to sneak handfuls each time I pass by!).


These chocolate drops can be found in Hotel Chocolat's new Cocoa Cuisine range, which offers a lovely selection of chocolate products designed for use in the kitchen (although unlike some "cooking" chocolate they also taste fabulous just as they are). Each bag costs £7.50, which works out at about £1.87 per 100g. A reasonable price, I think, considering the quality of the chocolate (as a comparison 100g of Green & Blacks 70% Dark Chocolate retails at around £1.89). Needless to say I'm very much looking forward to putting these to good use and will be posting about the recipes I've lined up to experiment with over the next week or two.

Also included in my box of delights was a bottle of Hotel Chocolat Classic Milky Liquid Chocolat, a drinking chocolate made with 72% dark chocolate and 50% milk chocolate.

Their drinking chocolate comes in a number of varieties including the very enticing Gingerbread and Winter flavours. All sound like the perfect way to warm up as the weather cools down. I can't wait to sit down with a big mug of this and will post my verdict soon.

Finally, there was also a little something included from Hotel Chocolat's Christmas Gifts range. More on that, together with a little giveaway, in a couple of weeks as we get closer to Christmas.

Many thanks to Hotel Chocolat for sending me these great samples to review.

Monday 11 October 2010

Somerset Apple Cake


Mmmm....it's been so long since I last made this cake I had forgotten how great it is. We have apples coming out of our ears at the moment thanks to the two lovely apple trees we have in the garden and this recipe is the perfect way to use a few up. What really makes this cake a bit special is the orange zest - every time I lift the lid on the cake stand I'm greeted with a wonderful waft of citrus and the orangey flavour complements the big chunks of apple so well.

Somerset Apple Cake
(adapted from The Complete Farmhouse Kitchen Cookbook produced in association with Yorkshire TV)

3oz/80g butter
6oz/175g caster sugar
Rind of 1 orange, grated
8oz/225g self-raising flour
1lb/450g Bramley Apples, peeled, cored and cubed
2 eggs, beaten
2 tbsp milk
Approx 1 tbsp granulated or demerara sugar

1) Grease and flour a 23cm/9inch cake tin. Preheat the oven to 180c/350f/gas mark 4

2) Cream the butter, sugar and orange zest until pale in colour. Mix 1 tablespoon of flour with the apples in a bowl.

3) Add the eggs and milk to the butter and sugar and beat in. Add the remaining flour and apples to the mixture and blend together well. Turn into the tin, sprinkle with the granulated/demerara sugar and bake in the oven for 40-50 minutes.

Wednesday 6 October 2010

Toad in the Hole with Roasted Onion Gravy - my go-to recipes


I love Toad in the Hole. It's just perfect for this time of year when you want something warm and comforting to round off the day. The thing I love the best about this dish though, and it's an absolute must for me, is the onion gravy to go with it.

Delia's Roasted Onion Gravy is the best I've come across so far and is super-easy to make. Plus you can make it a few hours in advance if you want to and reheat it later on while the Toad in the Hole is cooking. I didn't have so much luck with her batter recipe though (which is also included in the link below) - I found it turned out a bit flat. I hunted around for an alternative online and came across Anthony Worrall Thompson's version which I had much more success with and have stuck with ever since. It uses twice as much egg and less flour and the end result is a much poofier pudding (that's a technical term for you). Oh, but if you do ever decide to test out Delia's version I do NOT recommend you use a metal roasting tin - I found it sticks something terrible.

Here's a link to Delia's Roasted Onion Gravy (also to be found in How To Cook Book One).

Toad in the Hole
(adapted from a recipe by Anthony Worrall Thompson)

For the batter
115g/4oz plain flour
large pinch of salt
freshly ground black pepper
4 large eggs
300ml/1/2 pint milk

8 good quality sausages
2 tbsp/30g beef dripping or white vegetable fat

1) Make the batter by sifting the flour into a large bowl and adding the salt and pepper. Make a well in the centre and break in the eggs. Gradually beat the eggs into the flour then slowly beat in the milk until the batter is the consistency of double cream. Leave to sit for 30 minutes, or ideally 3-4 hours.

2) Preheat the oven to 200c/400f/gas mark 6.

3) Heat a large non-stick pan and cook the sausages over a medium heat until golden brown all over.

4) Place the dripping or vegetable fat into an ovenproof dish and put into the oven for 5 minutes or until the fat is hot and hazy. Add the sausages to the dish and pour in the batter. Immediately return the dish to the oven and cook for 35-40 minutes until well-risen and golden brown.

5) Serve with some veg on the side and lots of lovely gravy!

Serves 4-6 (note that Delia's gravy recipe only serves 2-3)

Saturday 2 October 2010

Whoopie Pies - Classic Chocolate & Buttercream

So then, Whoopie Pies. Apparently these are the new Cupcake. At least they were a few months ago anyway - I may be a little late jumping on this bandwagon. Maybe it's passed me by completely. Who knows! Late or otherwise I finally got around to making some after purchasing a book entirely devoted to Whoopie Pies a few weeks ago. The book, Whoopie Pies by Sarah Billingsley and Amy Treadwell is a very attractive, enticing little book full of pie and filling recipes to mix and match and play around with.


For the uninitiated, Whoopie Pies, or Gobs, originated in the US and are little cakey creations filled with a generous amount of marshmallow or buttercream. Wikipedia and other sources tell me that name arose when Amish women baked these for the local farmers' lunchboxes. On discovering them the farmers would shout "Whoopie"!

I decided to start with the basics by trying out the Classic Chococlate Whoopie recipe filled with a vanilla buttercream. I was hoping to try out the traditional marshmallow filling but this calls for a jar of Marshmallow Fluff which is apparently easy find in the US but much harder to track down over here.

I'm kind of in two minds about the finished product. I think I was expecting something lighter, maybe more biscuity, but they actually turned out to be quite dense, heavy and cakey. The buttercream was also very sweet, although the cocoa in the cakes provided a bit of a counterbalance. At the end of the day though I did like them and they seemed to go down pretty well when I took some into work. One thing's for sure, I'll definitely be making them again and trying out some different flavours and combinations.


Note - As this in an American book the ingredients are all measured in cups or, in the case of butter, sticks or tablespoons. I have therefore added my conversions to metric and imperial for those of you who don't have any measuring cups.

Classic Chocolate Whoopie
(adapted from Whoopie Pies by Sarah Billingsley and Amy Treadwell)

1 2/3 cup/230g/8 1/2oz cups all-purpose (plain) flour
2/3 cup/90g/3 1/4oz unsweetened cocoa powder
1 1/2 teaspoons baking soda
1/2 teaspoon salt
4 tablespoons/50g/2oz unsalted butter, at room temperature
4 tablespoons/50g/2oz vegetable shortening
1 cup (packed)/170g/6oz dark brown sugar
1 large egg
1 teaspoon vanilla extract
1 cup milk

1) Preheat the oven to 375f/190c/gas 5. Line two baking sheets with parchment paper.

2) Sift together the flour, cocoa powder, baking soda and salt into a bowl. In a large bowl beat the butter, shortening and brown sugar on a low speed until just combined. Increase the speed to medium and beat until fluffy and smooth. Add the egg and vanilla and beat for another two minutes.

3) Add half the flour mixture and half the milk to the batter and beat on low until just incorporated. Scrape down the sides of the bowl. Add the remaining flour and milk and beat until completely combined.

4) Using a spoon, drop about 1 tablespoon of batter onto one of the prepared baking sheets and repeat, spacing them at least 2 inches apart.

5) Bake one sheet at a time in the centre of the oven for about 10 minutes each, or until the pies spring back when pressed gently. Remove from the oven and let the cakes cool on the sheet for about 5 minutes before transferring them to a rack to cool completely.

Makes about 48 two-inch cakes.

Classic Buttercream

3 cups/420g/15oz confectioners (icing) sugar
1/2 cup/1 stick/110g/4oz unsalted butter, at room temperature
3 to 4 tablespoons heavy (whipping) cream
1 teaspoon vanilla extract
Pinch of salt

1) Beat the sugar and butter together until the mixture is crumbly, about 1 minute.

2) Add the cream, vanilla and salt and beat on high speed until smooth, about 3 minutes.

3) Pipe or spoon the buttercream onto the pies and sandwich them together.